Showing posts with label vegetarian. Show all posts

Thursday, July 2, 2015

Parmesan Roasted Zucchini

Pin It Now!

Happy July!  The holiday is upon us and I know people everywhere are preparing to beach it, grill it, chill it and of course, drink it!  This used to be the case for us until a certain little someone came along. :)  Now we are home before the fireworks, which is just fine by this momma.  Last year Ayden was just shy of 5 months old on the 4th of July and we tried to watch the fireworks but the poor guy was falling asleep on us.  We packed it up, headed home and beat the crowds.  Winning!


To date, my most popular and most pinned recipe on Pinterest is my White Wine Sangria, pictured above, which is perfect for patriotic holidays like Independence Day!  Today I'm sharing with you an equally delicious and easy recipe that would be great for any gathering or holiday.  Last week while I was making dinner with a hungry toddler clinging to my legs I had the inspiration to make a quick appetizer to hold us over until dinner was ready.  We had some zucchini sitting in the crisper that was just begging to be used up, and after a quick toss with olive oil and parm it was ready to roast.

Toddler approved!


This would be a perfect appetizer or side dish for the summer months.  Chop up any leftovers and toss it into pasta salad - it's delicious cold!  Served with white wine sangria you're sure to please the crowds.  ;)

Have a happy and safe holiday weekend!

XO

Parmesan Roasted Zucchini
| Prep: 5 mins. | Bake: 5-7 mins. |
3 small/medium zucchini, ends trimmed
2 tbsp. olive oil
Grated parmesan
Salt & Pepper

Preheat oven to 450 degrees.  Cut the zucchini in half lengthwise, then in half lengthwise again.  Toss in olive oil.  Arrange on a baking sheet, sprinkle with salt, pepper and a generous amount of parmesan.  Roast 5-7 minutes, or until desired tenderness.


Photobucket

Tuesday, March 31, 2015

Sweet Potato + Spinach Hash {Breakfast for Dinner}

Pin It Now!

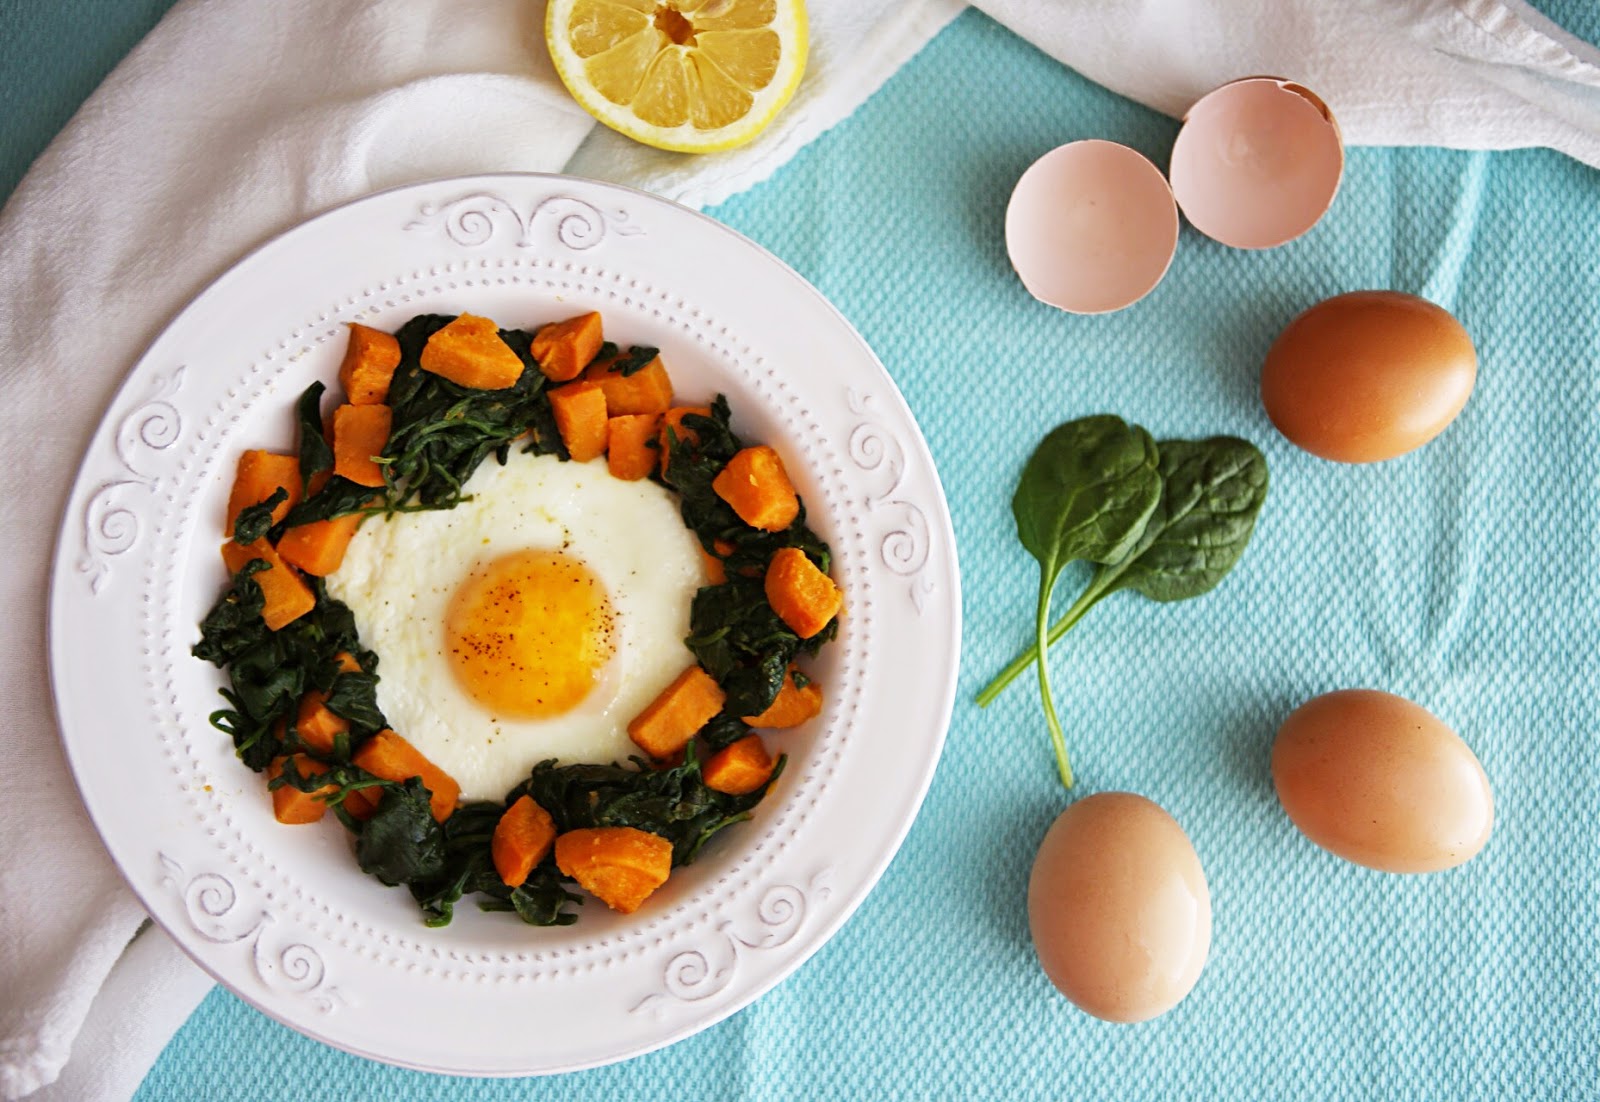
Today's recipe was born out of a desperate need for groceries.  I hadn't shopped, the house was a disaster of baby toys and I was too tired to deal with going to the market for anything.  Necessity is the mother of invention, right?  I had a single sweet potato, a couple handfuls of spinach leftover from making baked spaghetti, and a few eggs.  I thought to myself, this will either be awesome or a total flop. 


Guys.  It's awesome.  First off, there's nothing better than a runny egg yolk, and when in doubt, put an egg on it!  The first time I made this I didn't have any lemon and it was still delicious.  However, the second time I made it, I squeezed a lemon over the top of the hash before adding the egg and it was over-the-top amazing.  The lemon juice and the egg yolk combine and make an incredible sauce, and the tartness of the lemon gives the dish a nice bright note.  I'm starting to sound like I watch too much Chopped (I do.) so I'll shut my yap and get to it.

Run, don't walk.  Make this.  Now.


Sweet Potato + Spinach Hash with Egg
| Prep: 5 mins | Cook: 15 mins. | Serves: 2 |
1 sweet potato, peeled + diced
A few handfuls of fresh spinash
2 eggs
Sprinkle of garlic powder
Pinch of nutmeg

Heat 2 tsp of coconut oil in a medium skillet.  Peel and dice the sweet potato.  When the oil is hot, add in the sweet potato, sprinkle with salt and a pinch of nutmeg.  Saute, stirring occasionally, until beginning to caramelize, about 5 mins.  Add in 1/2 c water and continue to cook until water has evaporated and potatoes are soft, about 3-5 mins.  Transfer to a bowl and set aside.  Add the spinach to the same pan, sprinkle with salt and garlic powder and steam until wilted, about 2 minutes.  Meanwhile, heat 1 tsp coconut oil in a non-stick pan and cook the eggs to desired temperature.  While the eggs finish up, add the sweet potato back to the skilled and combine with spinach.  Squeeze lemon juice over the combination, serve it up and enjoy!


Photobucket

Saturday, November 22, 2014

Homemade Cranberry Sauce

Pin It Now!


Gobble Gobble!!  One of my favorite holidays is just four days away, and I couldn't be more excited!  We are hosting Thanksgiving dinner this year, and I've been planning and organizing for weeks now. It's still not entirely fall-ish weather wise, but at least it isn't 90+ degrees like it was a few weeks ago!  My scarves got to make a brief appearance on a couple of early mornings, but my boots have yet to see the light of day this year.


I know it's cliche, but I've really been thinking about my many blessings recently.  We are so fortunate to live the life we live.  All too often we see horrible reports of heartbreak and chaos from around the globe, and it's easy to fall into a negative mindset.  I've made a great effort to focus on the amazing positives in my life, and every day is better for it.  I'm so grateful beyond words for my sweet little blossoming family and cannot believe I have the privilege of being Robert's wife and Ayden's momma.  I'm so thankful for my job, my friends, my extended family near and far, and for YOU, my sweet readers.  Thank you for welcoming me into your homes and lives and for being such a supportive and loving audience.  I just love ya!


One of the essential sides at Thanksgiving is the cranberry sauce.  Typically it's an afterthought that we hurriedly buy pre-made at the market, but this year is going to be different.  On a whim last night I grabbed some organic fresh cranberries and announced to Hubby "I'm making cranberry sauce!" He wasn't as enthused as I, but that's alright.  My father-in-law looooooves the cranberry sauce that my sweet sis-in-law makes, so hopefully this one gets his stamp of approval on Thursday.  :)  This recipe is very similar to hers, only with fresh cranberries and a few tweaks.

One of the best things about this is that you can make it ahead, freeze it, and thaw it the day before Turkey Day!  Woohoo!  When it comes to making Thanksgiving dinner, timing is everything, and if you can make something in advance do it. 


Here's wishing you and yours a warm and healthy Thanksgiving!  I can't wait to report back with photos from Ayden's attempts at eating turkey and stuffing.  ;)

XO!

Cranberry Sauce with Apples and Oranges
| Prep: 10 mins. | Cook: 15-20 mins. |
16 oz fresh cranberries
3/4 c water
2/3 c sugar
3 tbsp pure maple syrup
1 tsp cinnamon
1 orange, small diced with rind
1/2 tsp vanilla
1 apple, unpeeled, small diced


Rinse cranberries and place in a medium saucepan.  Pour in approx 3/4 c of water (just enough to see it, but not cover the berries).  Set aside.  meanwhile, wash and dry the orange and apple.  Dice the orange, flesh and rind.  Add to the cranberries and water.  Add in sugar, maple syrup, cinnamon and bring to a simmer.   Cook on medium heat, stirring occasionally, until berries have burst and sauce has thickened (approx 15-20 mins or so).  Remove from heat and stir in vanilla.  Allow sauce to cool completely.

While sauce is cooling, dice the apple.  Add to cooled cranberry sauce and stir to combine.  At this point transfer the sauce to a freezer zip top bag if you plan to freeze.  Thaw in the fridge for 24 hours prior to serving.  Enjoy!


Photobucket

Tuesday, September 2, 2014

Baked Frittata with Spinach and Feta

Pin It Now!

Let's be real.  The past 24 hours have kicked my butt.  Teething has been torturing my poor sweet boy, turning a mellow, happy baby into a fussy, sleep-fighting, overtired and cranky mess.  I'm hoping that this extra large mocha I'm gulping down so lady-like will keep me semi-functional despite being up since 3:30 a.m.. Teething bites.  Nyuk nyuk.

I've had lots and lots of yummy ideas bouncing around in my head, colliding with to-do lists and an ever-changing informal schedule of naps and feedings, but the yummy ideas have mostly been just that.  Recipes these days are simple and quick and today's can even be done one-handed while balancing a squirming 6 month old on one hip.

Frittatas are essentially Italian omelettes, loaded with various cheeses, vegetables, meats and even pasta!  Traditionally made in a skillet, and either flipped to brown both sides, or slid under the broiler, they are a great way to use up the random odds and ends that tend to accumulate over the course of a week (random tomato half, I'm lookin at you...).  In the interest of convenience, I went with baking.  I'm a sucker for a stick-it-in-the-oven-and-walk-away recipe.

This dish is great either hot out of the oven/skillet, or at room temp.  Pour yourself a mimosa, serve up some fruit and toast and it's time for brunch!  What add-ins would you put in your frittata?  I'd love to hear the combos you come up with.  Enjoy!


Frittata with Spinach and Feta
| Prep: 5 mins | Bake: 17-20 mins | Serves: 6-8 |
6 eggs
2 tbsp. milk
salt & pepper
2 handfuls spinach
2 tsp olive oil
Feta
Tomato slices

Preheat oven to 375 degrees.  Butter a pie pan or spray with cooking spray and set aside.

Heat olive oil in a medium skillet and saute spinach until just wilted.  Set aside to cool slightly.  While the spinach wilts, beat eggs with milk.  Make sure to beat the eggs well to break up the whites.  Add cooled spinach to eggs and mix.  Pour eggs and spinach into pie pan, sprinkle with feta, and top with sliced tomato.  Bake approx. 17 minutes or until eggs are cooked through.


Photobucket

Tuesday, May 21, 2013

Baked Chile Rellenos {Saying Goodbye to Grandma}

Pin It Now!

I've tried over and over again to open this post eloquently, and have been failing miserably.  It could be a lack of coffee, or perhaps it's a product of the past week's ride on an emotional see-saw.

On Monday, May 13, one day after Mother's Day, my Grandma passed away.

AnnaBelle Chaparro had suffered from Alzheimer's for several years, and in all honestly, she had left us long ago.  But the finality of her passing means a different kind of goodbye, one that we can't tuck away in our minds as "not really goodbye."  For a long time we still had her here, albeit somewhat absent.  My mom put it perfectly when she said that Alzheimer's is "the long goodbye."


During my Grandma's final years, my mom and dad worked day and night to make sure she was well taken care of.  What started out as merely being there to make sure she wasn't in the house alone gradually became much, much more, and eventually turned into a complete role reversal, wherein they became the "parents" of a now fully-dependent Grandma.  It's a thankless and extremely hard job.  There truly should be an organization somewhere that awards medals and accolades to caregivers.

When I think of my Grandma, I picture her in the kitchen or in the garden.  She had a beautiful, lush garden that she took great pride in.  In the backyard she had apples, apricots, tomatoes, rhubarb, veggies of all kinds, and even a cherry tree.  She was an avid composter, and to this day I can still picture her coffee can sitting under the kitchen sink, full of scraps and things to compost for the garden.  Hubby and I planted a garden the weekend before Mother's Day, and I thought of her as we tucked the little plants into their new home.

My Grandma was a great cook.  She would whistle as she chopped and stirred, and soon there would be a table full of deliciousness waiting for us all to dig into.  Today I'm going to share one of her recipes with you.


Every Christmas, Grandma would make spanish food for the family dinner.  She would spend hours in the kitchen and the house would smell amazing!  I can still smell the chicken poaching for enchiladas and the aroma of roasted chiles wafting from the kitchen.  This recipe for baked chile rellenos is one of the stars of Grandma's Christmas dinner.  As I assembled this dish and the house started to smell like chiles, I couldn't help but feel her in the kitchen with me.  There were definitely tears falling as I stuffed the chiles, beat the eggs and shredded cheese, and still now as I write this.  I hope that when you make this dish you can reflect back on your favorite memories with your family, and smile.
Who knows, maybe it will become a favorite in your family, too.

Green Chile Rellenos
|Serves: 6-8| Prep: 10 mins| Bake: 40 mins|
10 green chiles, roasted and peeled*
cheese (jack/cheddar) cut into 10 strips
1/4 c cheese, shredded
3 eggs
1/4 c milk
2-3 tbsp flour
salt & pepper
hot sauce (optional)

Preheat oven to 350 degrees.  Lightly spray a baking dish with non-stick spray, or lightly butter. Set aside.

Stuff the chiles with the strips of cheese and arrange in baking dish.  Sprinkle with the shredded cheese.  Lightly beat the eggs and add the milk, flour, salt, pepper and dashes of hot sauce, if using.  Pour the egg mixture over the chiles.  Bake approx. 35 minutes, or until eggs are set.

*Green chiles can be purchased roasted in jars or cans.  Rinse them thoroughly to remove the added sodium.  To roast your own chiles, place them over open flame, turning occasionally, until charred on all sides.  Place roasted chiles in a glass bowl and cover with plastic wrap for 10-15 mins.  To peel, wipe the chiles with a paper towel until the charred skins are removed.


Photobucket

Tuesday, April 30, 2013

Back from hibernation... {Veggie & Quinoa Stuffed Bell Peppers}

Pin It Now!
You all must think I've either: a) forgotten about you or b) have been swept away to some hidden tropical paradise where there is no internet and an endless supply of pina coladas delivered to my hammock on the beach.  Well, rest assured I haven't forgotten about you.  And, alas, I have not been swept away to said tropical paradise. Sigh.

source


See.  Not lounging in that hammock.  And I'm certainly not seeing any pina coladas...

I've been doing both a whole lot of stuff, and a whole lot of nothing this year.  Some of it has been eventful, and some of it not, and I'm perfectly fine with both.  Some really yummy things have been creating in the kitchen, but for some reason my motivation to blog them has been definitely lacking, so I've been selfishly keeping it all to myself and sharing a little bit with my hubby cuz I have to.  ;)

Since you've been so patient and have put up with my awkward silence for the past four (wow, actually nearly FIVE) months, I'm back to share a delicious and simple recipe with you.  Along with a crummy instagram pic of said recipe.  You guys are so lucky.

I've taken to calling myself an "accidental vegetarian" as of late.  For some reason as soon as 2012 turned into 2013, my taste for meat all but vanished.  In fact, I've been finding red meat pretty repulsive.  I can handle seafood just fine, and the occasional bite of chicken, but that's it.  Hubby has been a great sport and even found that veggie burgers are pretty darn delicious.

Here is the recipe for our Veggie & Quinoa Stuffed Peppers that we had for dinner the other night.  They may not look like much, but these babies were tasty, and make great leftovers. Leave out the cheese to make this vegan. We had a simple side salad with a balsamic drizzle that  I will be sharing in a future post.


Veggie & Quinoa Stuffed Peppers
4 bell peppers, any color(s), tops and seeds removed
1/3 c chopped sweet onion (about half of a small onion)
1 small garlic clove, minced
1 1/2 c cooked quinoa
2 zucchini, diced
1 c fresh corn kernels (frozen is fine)
1/4 c cilantro, finely chopped
1/4 crumbled feta
1/2 c chopped asparagus
juice of 1/2 lime
Few pinches of mozzarella

Preheat oven to 350.  Line a small baking sheet with parchment and set aside.

In a large bowl, combine quinoa, diced zucchini, corn, cilantro, feta, asparagus and the lime juice.  Salt and pepper to taste.  Set aside.  In a small pan, heat 2 tsp olive oil and add chopped onions.  Saute until onions are beginning to soften, about 5 mins.  Add minced garlic and cook another 1-2 mins.  Add to the quinoa and veggies and stir to combine.  Spoon the mixture into each pepper and top with a pinch of mozzarella , if desired.  Bake approx. 20 minutes, until peppers are beginning to soften.
Photobucket

Friday, August 10, 2012

White Pizza with Pesto and Veggies

Pin It Now!

This is another perfect recipe for Meatless Mondays - and one that is sure to be a crowd pleaser.  Who doesn't love pizza?  Crispy, crunchy crust with ooey gooey melted cheese... mmmmm...

I think I may be hungry.  It's really a shame that we devoured this entire pizza and dashed any hopes of leftovers.


Produce stands everywhere are overflowing with amazing summer goodies right now.  For the moment I've gotten the stone fruit obsession calmed, so now I'm on to things like summer squash.  There may or may not be another zucchini recipe lurking on the horizon...  You're on the edge of your seats now, aren't you? 


Hubby declared this pizza "really yummy" and I've got to say I agree with him.  This will definitely be joining our weekly rotation.  One of the great things about pizza is that you can top it with pretty much whatever your little heart desires.  It's a great way to use up some of the random unused veggies that tend to accumulate over the week. 

Happy Friday!

White Pizza with Pesto and Veggies
1 prepared pizza dough, at room temp
1/2 c (or so) of homemade or store bought pesto
1 1/2 c shredded mozzarella
1 bell pepper, sliced
1 small zucchini, diced
1/2 c chopped asparagus
Garlic oil (recipe below)

Turn on your oven to the highest it will go (ours is 550) and preheat (with the pizza stone in) for about an hour.  In the meantime, let the dough come to room temperature and chop the veggies.

Lightly dust a sheet of parchment with flour.  Roll out the dough with a floured rolling pin until it's about 1/4" thick.  Spread pesto evenly across the dough.  Top with shredded cheese, chopped veggies and a couple turns of fresh cracked black pepper.  Drizzle whole pizza with a couple spoonfuls of garlic oil.  Bake for approx 8 minutes, or until cheese is brown and bubbly and crust is crisp.  Drizzle a tad more garlic oil over the top and sprinkle with parmesan cheese.  Enjoy!

For the garlic oil...
Pour about a cup of extra virgin olive oil into a jar and toss in several peeled garlic cloves.  Let sit for a couple days so the garlic flavor infuses the oil.  Use on pastas, pizzas, sandwiches, etc.

Photobucket

Friday, July 27, 2012

Homemade granola {gluten free}

Pin It Now!

Granola is one of my favorite foods.  I love granola with fresh fruit and some greek yogurt, and Hubby likes to top his smoothies with granola for a crunchy post-workout snack.  We've been buying tons of granola and the other day I realized that we could - and should - be making this at home.


Store bought granola can be loaded with oils, flavorings and preservatives, all of which I'd rather not indulge in.  Anything made at home gives you the ability to control what goes into your food.  In the case of this granola I used healthy coconut oil instead of vegetable or canola oil.

Coconut oil is something I'm only beginning to experiment with.  It is pretty easily found in most grocery stores - I get it at Trader Joe's.  It is high in saturated fat (hold on, don't freak out yet!) however the saturated fat in coconut oil is different from other oils in that it does not increase LDL levels.  Coconut oil has been found to be useful in losing weight, and increases metabolism by reducing stress on the pancreas.  It also strengthens the immune system and promotes healthy digestion.  Coconut oil is solid at room temperature, so must be melted before being added to most recipes.


When it comes to granola, you can customize with whatever ingredients you like.  I added in ground flax seeds and raw almonds.  You could also toss in some dried fruit or shredded coconut.  I think I'll make this a fall treat next time and use some pumpkin pie spice in place of the cinnamon.  Yum!

Homemade Granola
2 c rolled oats (make sure they are gluten free if that is a concern)
1 tbsp cinnamon (scant)
Pinch of salt
1 tbsp coconut oil, melted
1/3 c honey
1/2 c raw sliced almonds
1/3 c ground flax seeds

Preheat oven to 325 degrees.

In a medium bowl, stir together oats, cinnamon and salt.  Add in coconut oil and honey, stirring until thoroughly combined.  Spread mixture on a parchment lined baking sheet.  Bake 30-45 minutes, stirring occasionally.  (If you wanted the nuts toasted, add during the last 5-10 minutes and make sure to stir frequently to prevent them from burning.)  The longer the granola cooks, the crunchier it will be.  Cool completely before adding almonds (unless toasting) and flax seed.  Store in an airtight container.


Photobucket

Saturday, July 21, 2012

Veggie & Feta Quinoa {Family Weekend}

Pin It Now!

Like I mentioned last week, we've been busy little bees lately.  We had a fabulous family weekend in San Francisco, complete with city traffic and stunning views from the Golden Gate bridge.  Before we knew it the weekend was over and it was back to the real world.

Montalvos

Many Montalvos!

After a busy weekend I knew I wanted to keep dinner simple and light.  I made a nice big batch to have some leftovers for lunch the next day (it was great as a cold salad), and you could easily sub whatever veggies you have on hand to make your life easier.  This is a great dish for Meatless Mondays.


Veggie & Feta Quinoa
1 cup organic quinoa
1 medium (or 2 small) zucchini
1 1/2 c fresh corn
1/2 c crumbled feta

Cook the quinoa according to directions.  While the quinoa is cooking, slice the zucchini in half lengthwise and then cut into 1/4" half moons.  That's the technical term, right?  Quickly blanch the zucchini so that it retains its beautiful green color and remains crisp.  Set aside.  Steam the corn, if desired (I left mine fresh).

Once the quinoa is finished, combine with veggies in a large bowl.  Gently fold in feta right before serving.


Photobucket